This page is a 'prequel' to Hiram Kelley's text and images showing his restoration of his TD's tub. To see the tub restoration page click on KelleyTub.
[Webmaster's note: all material, i.e., text or images, contained on this webpage is the intellectual property of Hiram Kelley with copyright reserved.]
Bud requested I give a little background and include a few pictures of my TD as it looked before the big teardown. Firstly let me say "I’m no big time ‘T’ series expert". I own several later model MG’s, like an ‘A’ a ‘B’, and even an old non-running ZB magnet, but this is my first intimate encounter with a ‘TD’. Shoot, I’m honored Bud asked to host my pictures and observations on his website. Heck, if I was maybe more of an expert, I might have taken a pass on this particular example.
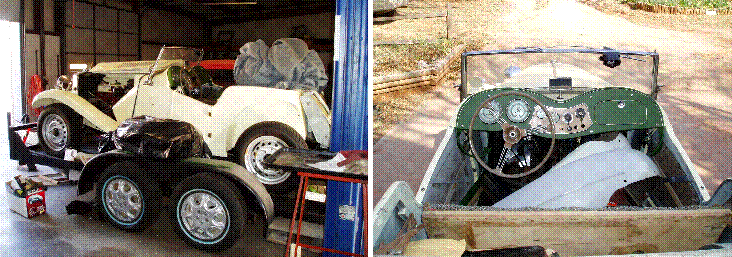
So, all that being said, here’s TD #25143 as it was back in March of 2006. It was only partially assembled as it had been purchased by a friend of mine from a lady whose husband had just passed away before he could finish its restoration. It looked fairly complete except for front and rear bumpers. No interior; but there were all new interior panels and seat covers stuffed in a big garbage bag piled on the trailer. ‘Shoe-horned’ inside the tub was a set of rear fenders and several small boxes of miscellaneous odds and ends. What wood I could see looked to be original and in fair condition (my assessment as to originality was correct- not so much on condition). The numbers matching engine looked complete; the widow stated that her husband and a friend had recently rebuilt it. This I’ve yet to confirm. With that bag full of interior bits and all the other pieces scattered around it appeared to be ‘all there’ and the asking price was not unreasonable.
After getting it home and unpacking all the various boxes of leftover and uninstalled parts I confirmed it was indeed complete except for the chrome front and rear bumpers- brackets were there- just no chrome pieces.
Now don’t get me wrong, I certainly don’t feel like I got taken in this deal. I knew ‘going in’ this TD still had some issues. And as I feared, under closer inspection, this was more of an interrupted ‘cosmetic’ type freshening-up than a nut and bolt restoration. I kinda expected as much; but was holding on to a faint hope the wood would be- at least- serviceable. Well ‘blessed are they who expect little- for they shall not be disappointed’. As once I got it home and up on jack stands, and after quite a bit of crawling around underneath with a flashlight, poking at all the accessible wood with a scratch awl, and having the bottom pieces of the hinge and latch pillars fall off onto my face, I knew I had a problem. I indeed may have let my enthusiasm get the better of sound judgment.
Well, two years pass by as I’m trying and decide what to do with this TD- just finish up this rather disappointing attempt at a restoration someone else has started, pass the project on to someone else and let them decide how to proceed, or- start over from scratch- take it back to a bare frame and try and do it right, wood and all.
It’s along about this time I got a bad case of the vintage racing bug. So that’s now my plan- I’ll start over and do a period correct vintage racer build-up. Plan to race with that CVAR bunch down in Texas if they’ll have me. I guess there’s just a little too much hot-rodder in me. I’ve even found some louvered bonnet top sections to take the place of the originals. Yes sir- nothing says ‘hot-rod’ quite as loud as louvered sheet-metal! But heck, I don’t plan on doing anything that could not be fairly easily undone some years down the road, after I’ve assumed room temperature that is. Just in case someone else wants to take it back to original after I’m through having fun with it.
Now that you know ‘my plan’ and what things looked like on the outside, have a look on the inside, under all that freshly painted sheet-metal.
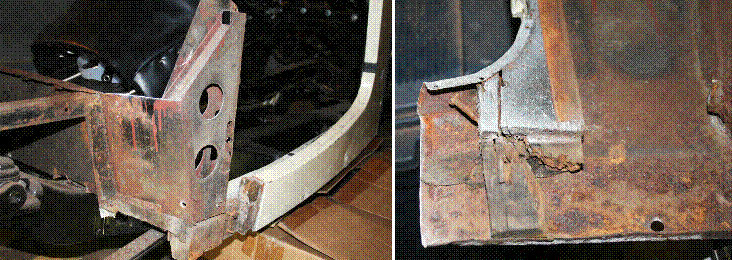
Here’s what the right rear hinge pillar and bottom main rail looked like. Notice the (original?) drips of red primer on the rear body tie bar, the rust along the side of the body frame rail along with the original packing strips still attached, and all that rusted sheet-metal. In some of those rust pits that quarter panel sheet-metal was tissue paper thin. It’s obvious this area had not been exposed for the previous restoration attempt, nor had any of the rotten wood or rusted sheet-metal problems been addressed.
So, it’s sad to say, but looks like what we have here is a pretty good example of how a ‘T’ series- may look quite presentable on the outside- and yet hide a multitude of restoration sins under shinny bright-work and a fresh coat of paint.
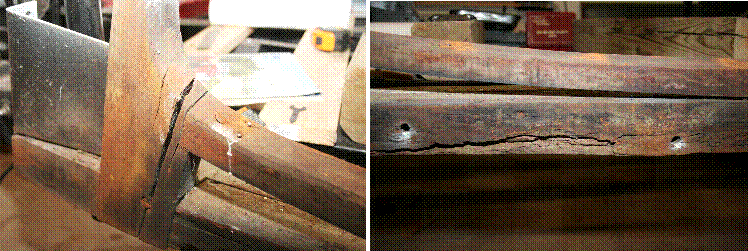
Here’s a close-up of the left side front latch pillar and main rail. Just look at the size of that crack in the latch pillar and all the rot and missing wood along the bottom of the main rail. Even kiln dried wood will shrink and loosen over time so it’s no surprise I’ve found not only this long crack in the lower hinge pillar (shrinkage crack?) but also both under door rails, and both the inner and outer top and side rails are now slightly too short with very loose fitting joints. Take this shrinkage, if observed, into account when measuring and cutting (or sanding) your new wood to length. Just duplicating the length of the original piece may well leave you needing to shim the joint for a tight fit.
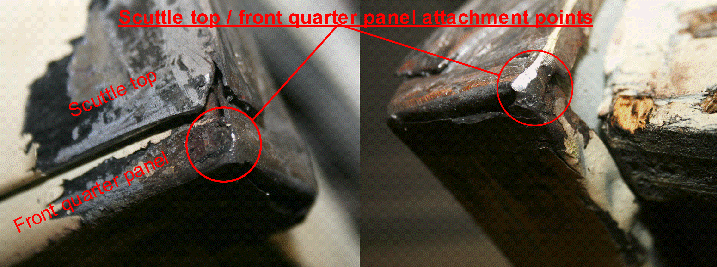
As I continued to dismantle the tub I eventually needed to separate the scuttle top from the front quarter panel sheet-metal; but I could find no detailed pictures of what this welded joint actually looked like. Even in Horst Schach’s "The Complete M.G. TD Restoration Manual" (2002) there were no pictures of the original and unmolested joint, only a description. On page 28 he describes this as "at the point where the front quarter panel and cowl join (at the right and left lower corners of the dash) there is a metal union that must be cut".
Well here’s what this juncture looks like on my TD after all the lead filler has been melted and wiped away. I’ve tried to show all the panel edges and circled the two weld points. It’s these two weld points that must be cut to release the scuttle top from the top, dashboard edge, of the front quarter panels.
I wasn’t worried about removing all the lead from the joint; I’ll either re-lead it later or just use some plastic filler after re-welding. Anyway, any lead left around the weld points needs to be removed. If not, it will most definitely let itself be known when you hit it with some energized mig wire- lead don’t weld worth a squat!
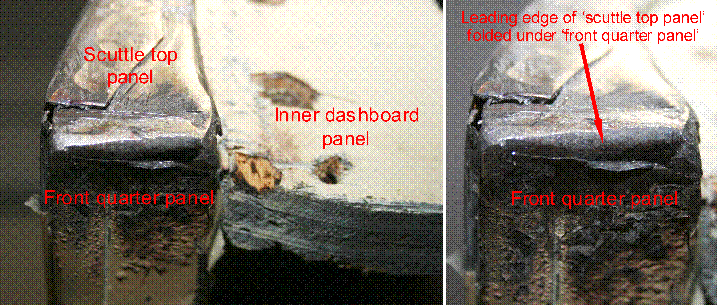
Notice how the lower edge of the scuttle sheet-metal is not welded; it is simply folded over and tucked under the scuttle side rail and overlapped by the quarter panel. There is one weld point to either side of this joint- one inboard, joining both panels nail flanges together, and one outboard, joining the two panel’s outer edges just below where the front quarter panel disappears underneath the outside bottom edge of the scuttle top.
What’s the shiny black stuff on the wooden joints?
Horst Schach, on page 32 of his book, remarked upon the shiny black substance cementing (his word) all the wooden joining surfaces, calling it a roofing tar like material; but in a photo caption he also describes it as a sealant (again his word)?
I suppose glue can also act as a sealant; but a sealant is not necessarily a glue so I’m a little confused.
The stuff in these joints is black and roofing tar-like in appearance; but it does not appear to be applied in such a way as to cover and protect the whole joint like a sealer. Its application appears rather more haphazard and ‘dabbed on’ to me, used more like glue than a sealer. But I submit, no one is going to use something with ‘roofing tar like properties’ as glue.
Malcom Green, on page 46 of his book "T Series Restoration Guide" (2003), states there was originally no glue used on any of the wooden joints and only suggests, if deciding to use glue, make sure it is exterior grade.
Well there is obviously something, whose residue is now black in color, which was used in the wood joints of this TD; but as to the earlier ‘T’ series body tubs referenced in Mr. Green’s book I have no direct knowledge.
Alan Alderwick, on page 36 of his book "How to Restore Wooden Body Framing" (1984), states with some certainty "the traditional adhesive used by coach-builders has always been animal glue, but one of the basic reasons for any frame needing restoration is the widespread use of this glue". He goes on to say this glue is not waterproof and becomes very brittle when set.
In my limited experience with old furniture, these types of animal based glues do tend to harden and crystallize with age, acting nothing like the modern glues we’re all become accustomed to. I suspect that over time, the hardened glue failed. Having failed it was turned to powder by friction and fell away from the inside of the joint as the tub flexed and moved, leaving not much more than a shiny residue and a dried out stain.
This type of glued-up joint seems to fail and break apart cleanly under stress. The glue becomes hard and brittle over time; with a shiny, crystallized appearance with little to no imbedded wood fragments (the external glue bond is weaker than the internal wood fiber bond). Where as in today’s modern glues, when a glued together wooden joint is broken apart; some wood fragments from either side of the joint may remain in the glue (the external glue bond is actually as strong, if not stronger, than the wood fibers internal bond).
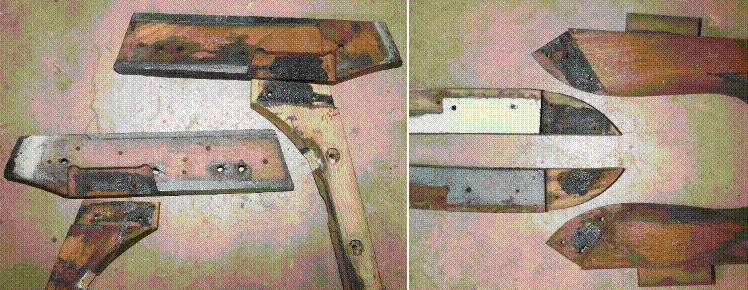
Here’s that shiny black stuff on the inner joining surfaces of the left and right scuttle side rail/ latch pillars and rear elbow/rear side rails. Notice how it never quite covers the joint.
Again the black material partially covering the inside of the left and right rear elbow/hinge pillar joints.
Also notice the absence of any black paint on surfaces covered by sheet-metal quarter panels, scuttle brackets, or the rear body tie bar. (The white paint is from the previous owner’s restoration attempt.)
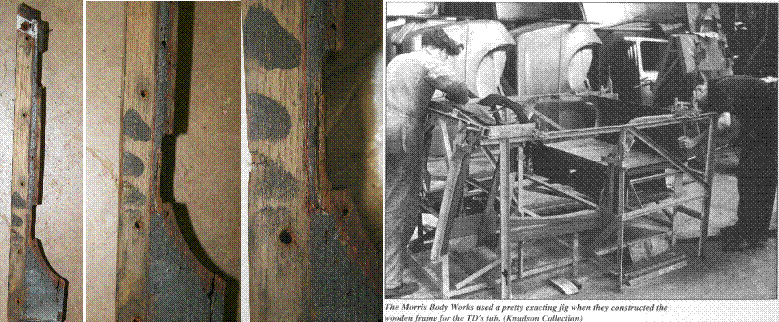
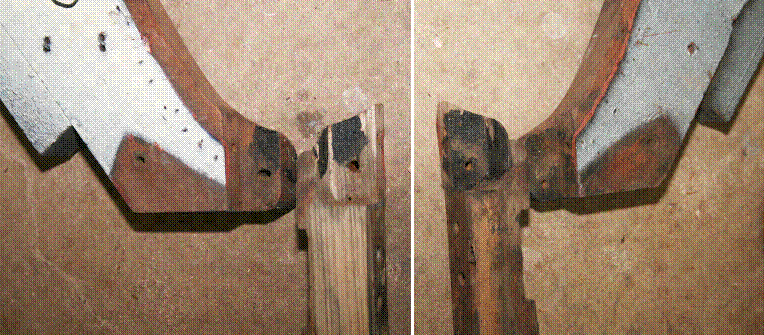
Now this won’t aid in your restoration but I though it kinda cool. Preserved underneath the forward edge of the rear body tie bar were these fingerprints. Looks like back at the Morris Body Works, a workman, with that black stuff on his fingertips, picked up this left side hinge pillar for placement into a TD tub assembly jig like the one pictured from Horst Schach’s book. He must have wiped off his hands afterward though, for these were the only fingerprints I found.
Notice too, the (original?) black paint on the pillar’s inner surface where not covered by the tie bar.
Now I did come across something that looked like an asphalt based seam sealer, flat black in color and still soft enough to be indented with a fingernail. But I only observed it on the outer front and side rails, and only on the front, forward facing side of the rails, sandwiched between the rails and the bolt flange of the TD’s sheet-metal bulkhead.
Click here for TD Tub building by Hiram Kelley