This article follows
Dynamator-for-Lazarus in describing how I went about converting
Lazarus, my 1952 MG TD #10855 from using a dynamo to using an
alternator. The alternator that I installed is U.K.-sourced
and is called a Dynamator. It is constructed with a mechanical
output for driving the TD's Tachometer Gearbox and has a potential
output of 45 amps. I purchased the Dynamator from Abingdon
Spares in Deep River, CT for about $220US. I have no financial
involvement with Abingdon Spares except that I've been sending
money to the organization since I bought Lazarus in 1988. The first article in this series,
Dynamator-for-Lazarus,
describes doing the conversion by using an RB106/2 Control Box to
aid in the wiring. I've learned that it is also possible to do
the conversion without having to utilize a control box, i.e.,
through the use of a common 8 connection wiring strip. That is
the technique used here. The wiring strip was purchased for
about $13US through Amazon and came in a package of 4 wiring strips
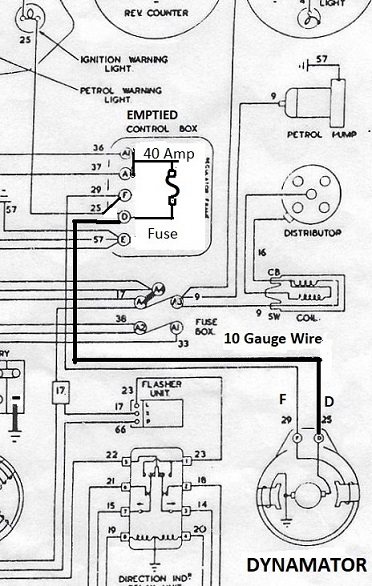
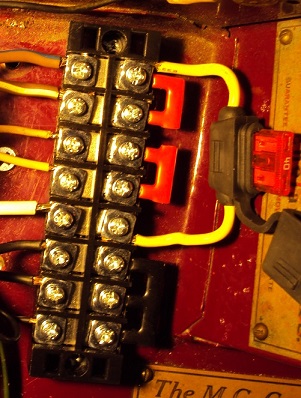
and 4 pieces of interconnection strips. Below is the modified portion of the
WSM wiring diagram that covers a TD with a 5 terminal control box on
the left and an image of the wired terminal strip on the right.
Terminals on the strip are numbered from the top down. #1 is
the brown/blue wire that feeds the Ignition Switch; #2 is the
brown/white wire that connects to the ammeter; #3 contains the small
yellow wire that comes from the Ignition Warning Light (it was
formerly on the Control Box D terminal with the D lead from the
dynamo); #4 is for the yellow/green wire that came from the dynamo
Field terminal (now comes from the Dynamator's Field terminal; #5 is
for the 10 gauge wire from the Dynamator's D terminal (was from the
dynamo's yellow wire); #6 and #7 are for the black ground/earth
wires from the wiring harness; #8 is for the black ground/earth wire
that goes to a ground connector at the battery's grounding/earthing
point. The heavy yellow wires are the leads from the 40 amp
fuse holder that connects the Dynamator output to the #1 and #2
terminal junction. The red pieces are shorting bars connecting
adjacent terminals. The black covered pieces connect the three
ground terminals together.
These articles are bound to be getting
improvements in the near future, so I heartily recommend that you
refresh your browser when you check them out. insert content here
Ttalk.info
Dynamator for Lazarus without Control Box
Headline 3