Ttalk.info
[ Home ] [Tech Index
] [ Picture This ] [
Autojumble ] [ Car Lists ] [
Search ] [ The53 ] [
FYI ] [ Ttalk ]
Picture This
Posting of images of interest to Ttalk viewers
Most images are thumbnails, so give them a click.
SU Damper Fix
From David Tinker, Powys, UK
I have owned my 51TD since it was reimported from
California in 1989. It has had a total rebuild in that time and more
recently a rebuilt engine.
Late last year I noticed a splutter from the engine each time
pulling away under power. It took me a while to find what the
problem was.
I unscrewed the carburetter damper assembly to find that the small
damper piston was missing which had dropped off into the bottom of
the piston shaft and retrieving the parts revealed how the piston
had been fixed by a previous owner. A press stud.
It had done a good job for more than 20 years so I raided my wife's
sewing basket to find an exact match!! Both damper pistons were
secured in the same way |
 |
| LHD vs RHD Rack and Pinion From
Stuart Duncan of Australia
via Gordon Lawson |
 |
| TF Wiring Loom
Attachments from Collin Stafford (3/29/08)
Bolt holding the wiring clip is hex head with nut
and washer on the inside of the wing.
Added, orig fuse block with its original
fuses.....believe that or not, but its true. Prince of light.
NA-8 Champion plug was in car when
purchased......burned down to 24,000 miles. Gotta believe they came
in the car.
|
  
 
|
| Synchrometer
Adapters for TF (John Progess 4/7/07) The fittings are made from 1"
schedule 40 sprinkler fittings. You need a 90 deg. ell, a coupling and a
short piece of pipe. I did not glue the pieces together, just slipped
them together. As you can see one end of the 90 deg. ell is machined
down to fit inside the carb throat. I machined them to fit each carb
individually as the throat diameters were slightly different (1.382"
dia. and 1.385" dia.). I did this to get a snug fit inside the throat of
the carb and also to help clearance of the side panels. The outer end of
the coupling is beveled to fit the end of the synchrometer. I also put
an "O" ring on the machined section in an effort to seal against the
carb flange (probably not necessary). I made two complete fittings so I
could have one for each carb allowing me to switch the synchrometer from
carb to carb during tuneup. |
  |
Temperature Sensor Coils(TF)-
Collin Stafford
Attached are 4 files of the Temp wire, orig.
clips, orig coil, routing.
and from Evan Ford:This picture is from my unrestored TD.
|
   
 |
| Gearbox Drain Plug Ring
From Bryan Sieling: Attached is a photo of the clip I have on my
gearbox drain plug. Shown is the brass plug, the clip, and
the copper washer. I found an identical clip on a spare
gearbox I have, so I think its a real part. I'm beginning to
think it might serve to keep the washer from falling off, because
it was very difficult to remove the washer in order to take the
picture as it kept getting hung up on the clip.
The other image is one showing the same split ring in the drain plug
of the gearbox from 'the53'.--Bud
|

 |
| Clutch Linkage Modifications\s
by Gordon Clark (Feb 28 '07)
I have been working quietly in the
background putting some details to my design for an entirely new
approach to the clutch actuators.
Here is a crude sketch which is still
missing quite a bit of data which I hope to have in the next several
days.
You can see that I'm using a
turnbuckle and nylok jam nuts to adjust and secure the rod. The
lever on the sump will be fabricated but will retain almost
identical dimensions. It will be wider to accomodate a sealed needle
bearing on the sump shaft.
I want to do away completely with the
clevis and pin arrangement.
In all cases I will be bolting the
rod ends directly to the sides of the lever(s). While this may seem
to impart side stresses, it has been shown by Don Harmer and John
Masters that is works well and is reliable, especially in Don
Harmer's case when it hasn't failed in 30 years! Pic below from John
Master.
|

 |
|
Adjustable Clutch Link by George Butz III
At Don Harmer's suggestion, I made the easy
to make adjustable upper rod. I just measured and cut it, used a
3/8-16 tap to tap the inside, bought a 3/8" threaded bolt/nuts,
and there it is. |

 |
| Brian Smith's Luggage Rack:
I sent some pictures off to you ... of a
luggage rack I made up that is quite functional and ALMOST looks like it
should be there. |


 |
| Brian Smith's MirrorsI
sent some pictures off to you ... that
covered installing some wing mirrors on a TD windshield frame |


 |
| Don's Door Latch from Don
Harmer
Click Here to view the full copy of the
article as presented in The Southeastern Mg T Register mgTalk of October
1988.
|
 |
| Bonnet Hinge
Supports, inner & outer Front and Rear |
  |
|
I was asked to provide pictures of the new
location for the temp sensor bulb, here they are. Two of them are in a
TD elbow and the third is of the one in my TD which is in the old
themostat housing. |
 
 |
| Breather tube lower clamp.
Source of images is unknown. |
  |
|
Thanks for the offer to put these up on Ttalk. Hopefully, someone will
id them. That said, now that I look at the photo, they are somewhat
different. One clearly has a split rivet hole, the other does not.
They were clearly on the vehicle, maybe not original, when I took it
apart. I put them in a bag marked "gas tank rubber parts".
Dave Rome |
 |
Gordon,
I opened this XPAG engine yesterday to
adjust the valves and found a homemade oil deflector -- to keep the
oil from the #1 rocker for squirting on the underside of the oil
filler cap, hence causing a leak. Necessity is the mother of
invention.
John Safety Fast!
John H Twist
University Motors Ltd
6490 Fulton Street East
Ada, Michigan 49301
616 682 0800
616 682 0801 fax
www.universitymotorsltd.com
|
 
 |
From Gordon Lawson:
Gordon,
I've
been fitting these brackets to TDs for a long time. It's
not original but it sure keeps that tach box from shaking all
over and finally shorting out the distributor.
Safety Fast!
John H Twist
|

 |
|
Innards of Engine, ready for the sump. Shows Moss nyloc nuts on rod
bolts and main caps. |
 |
Wheel Bearings - from George
Butz III
Hi Bud, I ran across this and
realized I don't think I ever sent it to you. This shows the
early TD hub "seal" felt, outer cap, and original open bearing.
The permanently sealed, locally available bearing is a direct
replacement for the felt and the bearing. It could also be used
in the later TD's with the grease caps, but I think the sealed
version is more expensive.
Asked: Thanks, George.
Is the FM 304S the sealed version?
Hello Bud, I just called
my auto parts friend to clarify. He states that the "304"
is the generic industry bearing size, with different brands
having different prefixes. One "S" is single-sided, metal
shield, "SS" double sided metal shielded, "F" rubber, single
side, and "FF" double sided, rubber shielded. Shielded
means permanently sealed as well. George
|
 |
| From
Mike
Eldred: Last fall, or early winter, I took my TF on one last drive
- it turned out to be a disaster. As I was driving along I heard a
"bang!" followed by a very loud metallic "clack, clack, clack,clack."
I thought I had thrown a rod.
I had the car towed home and put in storage over the winter.
After a few other projects this spring, I made enough room in the garage
to begin tearing down the engine. These photos show what I found:
The head of a valve had broken off in #4 cylinder and must have shot
around in there. It banged up the head just a little bit, and
smashed the top of the piston, as you see.
Amazingly, it didn't score or scratch the cylinder even a little bit.
So I'm looking for advice. Can I just replace the single piston
and rod? Can I still get original weight pistons? Where
should I look? (I'm located near Abingdon Spares.) I will
plan to replace all the rod bearings at the same time.
Or should I replace all four pistons? Money IS an object here, but
I don't want to do all this work and fail to do an adequate job. |


 |
| |
|
| TF Battery Box Wood --
Colin Stafford
Bud here is the details of the battery
box for the site. As expected many of these are long gone.
The whole thing is painted in flat
black, wood and bolts. The hex bolt has washer under as per the pic.
but I missed a little line on the dwg. so it does not show. Caught
by Dave Payne. anyway it show on the pic.
re: Battery Hold down angle.......this
is an item which gets lost.....the little rubber L-shaped pieces
that go on the hold down bracket and around the corner of the
battery.
|
Images on separate page. Click here
for link. |
|
|
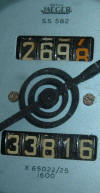
| TD Speedometer Face Showing 1600 TPM
for standard TD w/5.125 rear end TPM=Turns Per Mile of speedometer
cable |
 |
| Overflow Pipes on TD in
Goguen Museum Bud Krueger 3/20/06 |
 |
| Arnolt Heater Bud Krueger March
6, 2006 |
 
 |
| Glovebox Trim Bud Krueger
May 30, 3005 |

 |
| Clutch Return Spring
w/modification to prevent loss
Bud Krueger May 19, 2005 |
 |
| TD Gas Tank Straps -
submitted by Dennis Sexton |
  |
|
Rear Side Curtain Mounting
Sleeve with Screw& Curtain Bracket with Notch
Images by Bud Krueger for Jesus Benajes
|
   |
For Anti Sway Bar Images click
here.
Here are Dave's Images -- this
time they're not thumbnails. Use your zoom. --- Bud Hey Bud,
Getting quite a few folks asking about this maybe you can post
these?
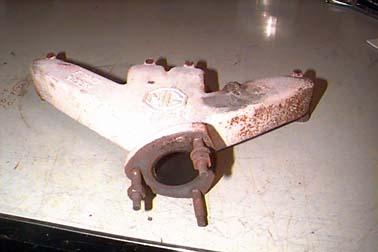
Here are before, durring & after shots:
DPO obviously had crack repaired while this was on the car!
Found this lovely "lump" hiding under the carbs:
I ground it down, re-welded and beed-blasted it. (don't
waste your time blasting...no discount from Jet-Hot for all
my work
there, they still "blast it" as part of their service) If
you have a crack, fix it first thought, as they send those
"out of house"!
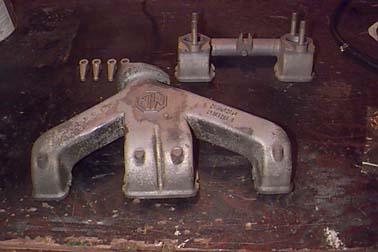
Here is the "finished" manifold. 5 years later it looks
about the same! (Sterling Finish ..cheapest)
Cost right around $100.00.... Shipping priorty mail
through post office with $125 insurance was $20.00.
"In House" turn-around was quoted as 5 days.
Cheers & Best Regards,
David 55 TF1500 #7427
|
|
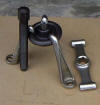
| Wheel Puller - Bud |
 |
|
|
| Turn Signal Relay and
Switch Mounting in 'the53' |
  |
| '53 TD from Colin Stafford |
   |
| TF of Dave Sheward Click on
the image to see Dave's stuff |
 |
| From
Steve Averka:
I purchased a rather used Marshall J75
Supercharger for my TD.
Just finding one has been a satisfying endeavor. Actually getting it to
work properly well...
Unfortunately it was taken apart for repairs many, many years ago and
was in pieces in a box. I have all the aluminum case pieces. As far as I
can tell the thing seams like it is mostly complete, except for the end
opposite the nose extension.
It looks to me like I have the following for that end; 2ea sleeves the
seals ride on, 2 thin nuts for the ends of the rotors, 2 ea spacers that
are 1.752†id x 1.955od x .195†high , and 2 ea seals still in the end
piece. I know the bearings are missing from that end. I also know the
nut on the drive gear coupler is missing.
Does anybody have any information that would help me get this thing back
together? I have done a search of the archives and while prints were
discussed I can not locate any. I have emailed John Bibby a few days ago
– no reply |

 
 |


![]()


![]()
![]()

![]()


